Have you ever wondered if you can make your own physics engine in JavaScript? If so, you have come to the right place. We are going to build a Physics engine from scratch in JavaScript.
Before we start, I should mention that this tutorial assumes you have a good understanding of Vectors. Don’t worry if you do not yet have this understanding — Vectors are simple: get the Vector.js.
What Is Verlet Physics?
According to Wikipedia:
Verlet integration is a numerical method used to integrate Newton’s equations of motion. It is frequently used to calculate trajectories of particles in molecular dynamics simulations and computer graphics. The algorithm was first used in 1791 by Delambre and has been rediscovered many times since then, most recently by Loup Verlet in the 1960s for use in molecular dynamics.
In simple terms, Verlet physics is just a system of connected dots.
In a Verlet system, we have 2 main components:
- Points (dots)
- Constraints (sticks)

Dots
The dots have basic physics applied to them. We have to keep track of the dots’ current and old positions to add the physics behavior to them — you'll see this when we implement it.
// Dot.js
class Dot {
  constructor(x, y) {
    this.pos = new Vector(x, y)    this.oldpos = new Vector(x, y)    this.friction = 0.97
    this.groundFriction = 0.7
    this.gravity = new Vector(0, 1)
    this.radius = 5
    this.color = "#e62a4f"
    this.mass = 1
  }
}
We have the basic setup, now let's render the dots and make them move.
// Dot.js
update() {
  let vel = Vector.sub(this.pos, this.oldpos);  vel.mult(this.friction);
  // if the point touches the ground set groundFriction
  if (this.pos.y >= CANVAS_HEIGHT - this.radius && vel.magSq() > 0.000001) {
    var m = vel.mag();
    vel.x /= m;
    vel.y /= m;
    vel.mult(m * this.groundFriction);
  }
  this.oldpos.setXY(this.pos.x, this.pos.y);  this.pos.add(vel);  this.pos.add(this.gravity);
}
The update function will update the position and handle the physics of the dot.
To do Verlet integration, we have to calculate velocity based on dots old position.
In the first line, we are subtracting the current position from the old position to get the desired velocity. After calculating the velocity, we apply friction to the dots, so they come to rest instead of sliding forever.
Then, we update the old position by saying this.oldpos.setXY(this.pos.x, this.pos.y) and add the velocity and gravity to the position.
We also want to make them stay inside the canvas, so we have to add some checks. We will also add another function: constrain():
// Dot.js
constrain() {
  if (this.pos.x > CANVAS_WIDTH - this.radius) {
    this.pos.x = CANVAS_WIDTH - this.radius;
  }
  if (this.pos.x < this.radius) {
    this.pos.x = this.radius;
  }
  if (this.pos.y > CANVAS_HEIGHT - this.radius) {
    this.pos.y = CANVAS_HEIGHT - this.radius;
  }
  if (this.pos.y < this.radius) {
    this.pos.y = this.radius;
  }
};
Let’s add the render method too:
// Dot.js
render() {
  ctx.beginPath();
  ctx.fillStyle = this.color;
  ctx.arc(this.pos.x, this.pos.y, this.radius, 0, Math.PI * 2);
  ctx.fill();
  ctx.closePath();
}
Setting up:
// index.js | setup
let canvas = document.getElementById("c")
let ctx = canvas.getContext("2d")
let CANVAS_WIDTH = window.innerWidth
let CANVAS_HEIGHT = window.innerHeight
canvas.width = CANVAS_WIDTH
canvas.height = CANVAS_HEIGHT

let dots = []

for (let i = 0; i < 50; i++) {
  dots.push(
    new Dot(Math.random() * CANVAS_WIDTH, Math.random() * CANVAS_HEIGHT)  )
}

function animate() {
  ctx.clearRect(0, 0, CANVAS_WIDTH, CANVAS_HEIGHT)

  for (let d of dots) {    d.update()    d.constrain()    d.render(ctx)  }
  requestAnimationFrame(animate)
}
animate()
We added a lot more dots in random positions and then update() constrain() render() them.
Let's see what that looks like:
Excellent — it's just a start, but finally, we have something.
Now we are going to add the sticks!
Sticks
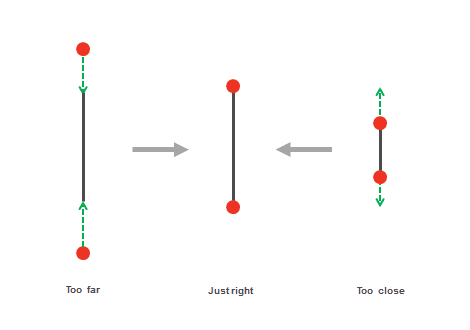
Sticks are the core of Verlet physics. Sticks make sure that the dots don’t get too far or too close to each other — they constrain dots to a certain distance.

Stick.js class is relatively simple. It will take two Dots as an argument and a length. But if the length is not defined, we will calculate the length based on the dot’s position.
// Stick.js
class Stick {
  constructor(p1, p2, length) {
    this.startPoint = p1    this.endPoint = p2    this.stiffness = 2
    this.color = "#f5476a"

    // if the length is not given then calculate the distance based on the position
    if (!length) {
      this.length = this.startPoint.pos.dist(this.endPoint.pos)    } else {
      this.length = length
    }
  }
}
Now let's add the actual core of the algorithm, This resolves and updates the dot’s position based on the stick’s distance, ultimately constraining it to a certain distance from all other dots.
// Stick.js
update() {
  // calculate the distance between two dots
  let dx = this.endPoint.pos.x - this.startPoint.pos.x;
  let dy = this.endPoint.pos.y - this.startPoint.pos.y;
  // pythagoras theorem
  let dist = Math.sqrt(dx * dx + dy * dy);
  // calculate the resting distance betwen the dots
  let diff = (this.length - dist) / dist * this.stiffness;

  // getting the offset of the points
  let offsetx = dx * diff * 0.5;
  let offsety = dy * diff * 0.5;

  // calculate mass
  let m1 = this.startPoint.mass + this.endPoint.mass;
  let m2 = this.startPoint.mass / m1;
  m1 = this.endPoint.mass / m1;

  // and finally apply the offset with calculated mass
  if (!this.startPoint.pinned) {
    this.startPoint.pos.x -= offsetx * m1;
    this.startPoint.pos.y -= offsety * m1;
  }
  if (!this.endPoint.pinned) {
    this.endPoint.pos.x += offsetx * m2;
    this.endPoint.pos.y += offsety * m2;
  }
}
Okay, I think we are good to go! Let’s add the render function:
// Stick.js
render(ctx) {
  ctx.beginPath();
  ctx.strokeStyle = this.color;
  ctx.moveTo(this.startPoint.pos.x, this.startPoint.pos.y);
  ctx.lineTo(this.endPoint.pos.x, this.endPoint.pos.y);
  ctx.stroke();
  ctx.closePath();
}
Setting up:
// index.js | setup
let canvas = document.getElementById("c");
let ctx = canvas.getContext("2d");
let CANVAS_WIDTH = window.innerWidth;
let CANVAS_HEIGHT = window.innerHeight;
canvas.width = CANVAS_WIDTH;
canvas.height = CANVAS_HEIGHT;

// arrays
let dots = [];
let sticks = [];
// forming a BOX
dots.push(new Dot(100, 100, (Math.random() - 0.5) * 100.0); // x, y, vx, vy
dots.push(new Dot(200, 100));
dots.push(new Dot(200, 200));
dots.push(new Dot(100, 200));

// sticks
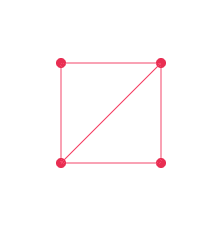
sticks.push(new Stick(dots[0], dots[1]))sticks.push(new Stick(dots[1], dots[2]))sticks.push(new Stick(dots[2], dots[3]))sticks.push(new Stick(dots[3], dots[0]))sticks.push(new Stick(dots[3], dots[1]))
function animate() {
  ctx.clearRect(0, 0, CANVAS_WIDTH, CANVAS_HEIGHT);

  for (let d of dots) {
    d.update();
    d.constrain();
    d.render(ctx);
  }
  for (let s of sticks) {    s.update();    s.render(ctx);  }
  requestAnimationFrame(animate);
}
animate();
Let’s see the results:
As you can see, we have a box! Well, a box that acts like it’s made of Jello, That’s because, in a single frame, one update per stick is not enough to make the dots rest at their length. We have to iterate the simulation as many times as we can — the more the iterations, the more the rigid box will be.
Adding these lines to the existing code will make the box rigid:
// index.js | setup
const ITERATION = 100 // max physics iterations per frame
function animate() {
  ctx.clearRect(0, 0, CANVAS_WIDTH, CANVAS_HEIGHT)

  // iterate over the simulation
  for (let i = 0; i < ITERATION; i++) {    for (let d of dots) {
      d.constrain()
    }
    for (let s of sticks) {
      s.update()
    }
  }

  for (let d of dots) {
    d.update()
    d.render(ctx)
  }
  for (let s of sticks) {
    s.update()
    s.render(ctx)
  }

  requestAnimationFrame(animate)
}
animate()
Looks amazing, isn’t it?
Entity.js: managing dots and sticks in one place
Okay, now we have Dot.js and Stick.js. Both are working nicely, but the problem is we don't have much control over how we use them.
We will create an Entity Class that will easily handle the Updates and Renders of the Verlet Object. I'm going to paste the whole code here — it’s nothing special:
// Entity.js
class Entity {
  constructor(iterations) {
    this.dots = []
    this.sticks = []
    this.iterations = iterations || 16
  }

  addDot(x, y, vx, vy) {
    this.dots.push(new Dot(x, y, vx, vy))
  }

  addStick(p1, p2, length) {
    this.sticks.push(new Stick(this.dots[p1], this.dots[p2], length))
  }

  updatePoints() {
    for (let i = 0; i < this.dots.length; i++) {
      this.dots[i].update()
    }
  }

  updateSticks() {
    for (let i = 0; i < this.sticks.length; i++) {
      this.sticks[i].update()
    }
  }

  updateContrains() {
    for (let i = 0; i < this.dots.length; i++) {
      this.dots[i].constrain()
    }
  }

  renderPoints(ctx) {
    for (let i = 0; i < this.dots.length; i++) {
      this.dots[i].render(ctx)
    }
  }
  renderSticks(ctx) {
    for (let i = 0; i < this.sticks.length; i++) {
      this.sticks[i].render(ctx)
    }
  }

  update(ctx) {
    this.updatePoints()
    for (let j = 0; j < this.iterations; j++) {
      this.updateSticks()
      this.updateContrains()
    }
    this.renderPoints(ctx)
    this.renderSticks(ctx)
  }
}
Using the Entity Class:
// index.js | setup
...
let box = new Entity(100)
// x, y, vx, vy added random velocity in first dot to make the box rotate a little bit
box.addDot(100, 100, (Math.random() - 0.5) * 100.0)
box.addDot(200, 100)
box.addDot(200, 200)
box.addDot(100, 200)

box.addStick(0, 1)
box.addStick(1, 2)
box.addStick(2, 3)
box.addStick(3, 0)
box.addStick(3, 1)
...
Yes, this is looking pretty clean and manageable!
Let's take a look at the final result:
Now we can create lots of fun Verlet Shapes with this Entity.js class!
Verly.js: A physics engine I wrote
Verly.js is a Robust Verlet physics engine I wrote. It has many cool features:
- Attraction — Repulsion behavior
- Basic Shapes
- Box, Hexagon, Cloth, Rope, Ragdoll
- Cloth Tearing
- Typography and Text
With Verly.js you can create a tearable cloth in just 15 lines of code:
// Verly.js | demo
let canvas = document.getElementById("c")
let ctx = canvas.getContext("2d")
let width = (canvas.width = 800)
let height = (canvas.height = 600)

let verly = new Verly(16)let cloth = verly.createCloth(150, 150, 250, 250, 15, 2)
function animate() {
  ctx.clearRect(0, 0, width, height)
  verly.update()  cloth.tear(100) // tear threshold  requestAnimationFrame(animate)
}
animate()
Demo: https://anuraghazra.github.io/Verly.js/
Source-code: https://github.com/anuraghazra/Verly.js
Examples: https://anuraghazra.github.io/Verly.js/examples
Take a look at some of the examples in my Verly.js Physics Engine, which I created some time ago. I added almost everything in that engine.


Codepen examples:
Verly.js’s API is easy to use and flexible because of its Entity Component Structure.
Thanks for reading — I hope you learned something!
Other places to learn about Verlet physics:
Amazing Article At DataGenetic